Bull bar installation instructions Wellington Point
Installation Instructions Dee Zee Since 1975, Go Rhino Products has remained a leader in the development, design and manufacturing of innovative, stylish and practical aftermarket automotive accessories. Go Rhino offers a variety of truck accessories including sidesteps, front guards, winch guards, exhaust tips, bed rails, bed bars, sport bars…
Installation Instructions Dee Zee
Bull Bars Broadfeet. It's Easy To Install Bull Bars & Grille Guards. Most of our Grille Guards are easy to install. Each one is custom-designed to your exact year, make, and model truck or SUV for a perfect fit. They're even designed to mount to existing holes in your frame, so you can bolt your Bull Bar directly to your vehicle without any drilling, cutting, or, Align the bull bar so that a 20mm gap exists between the top surface of the bull bar and the underside of the flare. Tighten all bolts to the torque settings listed on page 1. 22. Remove and discard the bracket that holds the inner guard to the radiator support panel by removing the nut and the plastic clip. Repeat for the other side. 20 mm. FITTING INSTRUCTIONS Product: T15 Fleet Frontal.
24/01/2017В В· GET A WESTIN BULL BAR: http://amzn.to/2oNZqYw Link to Light bar video: https://youtu.be/BI0LInVm4s4 Installing a Westin Bull Bar on Chevy Tahoe GM Truck. Man... Ben is back in the Go Rhino Garage to cover the installation of the RC2 LR bull bar on the Chevy Colorado. Note that this is a Z71 model, so check the installation instructions for minor differences in the process for different trim levels.
possible for a clean installation. Once properly trimmed, re-install the air dam using the factory hardware. Re-install the Bull Bar as described in Steps 5—6. Tighten Bracket to vehicle hardware only. 8. LED Light is preinstalled in Bull Bar. Verify that light is properly installed. Use slots in top plate on Bull as possible for a clean installation. Once properly trimmed, re-install the air dam using the factory hardware. Re-install the Bull Bar as described in Steps 5 – 6. Tighten all hardware. 8. Do periodic inspections to the installation to make sure that all hardware is secure and tight. To protect your investment, wax this product after
Align the bull bar so that a 20mm gap exists between the top surface of the bull bar and the underside of the flare. Tighten all bolts to the torque settings listed on page 1. 22. Remove and discard the bracket that holds the inner guard to the radiator support panel by removing the nut and the plastic clip. Repeat for the other side. 20 mm. FITTING INSTRUCTIONS Product: T15 Fleet Frontal A list of Bull Bars made and distributed by Broadfeet Motorsport Equipment
as possible for a clean installation. Once properly trimmed, re-install the air dam using the factory hardware. Re-install the Bull Bar as described in Steps 5 – 6. Tighten all hardware. 8. Do periodic inspections to the installation to make sure that all hardware is secure and tight. To protect your investment, wax this product after A list of Bull Bars made and distributed by Broadfeet Motorsport Equipment
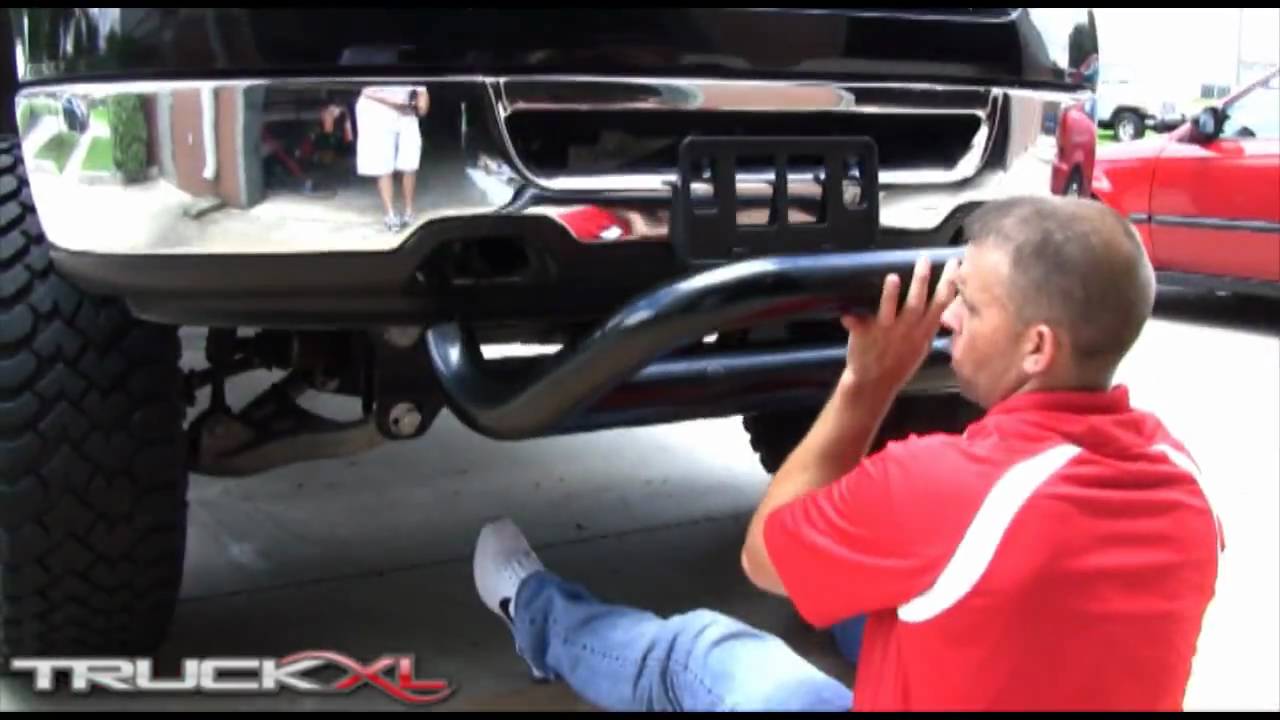
Whether it's a Dodge Ram Bar or a Colorado Bull Bar on your Chevy; Black Horse Off Road bull bars are made to directly bolt up to your specific vehicle and come complete with all the necessary installation hardware and step-by-step instructions, enabling you to mount them … installation instructions automotive products, install the bull bar to the mounting brackets using 7/16 hardware (driver side shown). figure 3 figure 4 care instructions regular waxing is recommended. do not use any type of polish or wax that may contain abrasives. stainless steel products can be cleaned with mild soap and water. stainless steel polish should be used to polish small
Stainless Steel Bull Bars - Description: Note on smaller trucks the tubing of the bar is 2.5* All Bull Bars come with complete mounting kits, fog light mounting kits, license plate relocation kits (if needed) and installation instructions. Repeat Steps 2 & 3 to install the passenger side Mounting Bracket. 5. With assistance, hold the Bull Bar up in position on the outside of the Mounting Brackets. Bolt the Bull Bar to the Brackets with (4) 10mm x 30mm Hex Bolts, (8) 10mm Flat Washers and (4) 10mm Nylon Lock Nuts, (Figure 9). Do not tighten hardware at this time. 6.
Stainless Steel Bull Bars - Description: Note on smaller trucks the tubing of the bar is 2.5* All Bull Bars come with complete mounting kits, fog light mounting kits, license plate relocation kits (if needed) and installation instructions. Position Bull Bar on the outer side of Mounting Brackets. Install Bull Bar onto Mounting Brackets using the included (4) 10mm x 35mm Hex Head Bolts, (4) 10mm Lock Washers, (4) 10mm Hex Nuts, and (8) 10mm Flat Washers (Figure 3). Do not tighten at this time. 6. Level and adjust Bull Bar properly; then tighten all hardware at this time. 7.
It's Easy To Install Bull Bars & Grille Guards. Most of our Grille Guards are easy to install. Each one is custom-designed to your exact year, make, and model truck or SUV for a perfect fit. They're even designed to mount to existing holes in your frame, so you can bolt your Bull Bar directly to your vehicle without any drilling, cutting, or Stainless Steel Bull Bars - Description: Note on smaller trucks the tubing of the bar is 2.5* All Bull Bars come with complete mounting kits, fog light mounting kits, license plate relocation kits (if needed) and installation instructions.
Ben is back in the Go Rhino Garage to cover the installation of the RC2 LR bull bar on the Chevy Colorado. Note that this is a Z71 model, so check the installation instructions for minor differences in the process for different trim levels. Since 1975, Go Rhino Products has remained a leader in the development, design and manufacturing of innovative, stylish and practical aftermarket automotive accessories. Go Rhino offers a variety of truck accessories including sidesteps, front guards, winch guards, exhaust tips, bed rails, bed bars, sport bars…
Installation Instructions Bull Bar (#51039&51040) 07 CHEVY SILVERADO 2500 HD / 07 GMC SIERRA 2500 HD Cleaning and Maintenance To protect your investment, wax this product after installing. Regular waxing is recommended to add a protective layer over the finish. Do not use any type of polish or wax that may contain abrasives that could 24/01/2008В В· 6. If fitting optional indicator assemblies to bull bar fit these as per instructions supplied with indicator kit. 7. Place the original towing hooks on the BOTTOM of the chassis and bull bar mounting holes. Place the 2 packers, one each side, onto the lower bolt holes between the tow hooks and the bull bar. Using the 4 M12x50mm bolts, spring
www.truckgeardirect.com
INSTALLATION INSTRUCTIONS SmartChamp.com. installation instructions automotive products, install the bull bar to the mounting brackets using 7/16 hardware (driver side shown). figure 3 figure 4 care instructions regular waxing is recommended. do not use any type of polish or wax that may contain abrasives. stainless steel products can be cleaned with mild soap and water. stainless steel polish should be used to polish small, Repeat Steps 2 & 3 to install the passenger side Mounting Bracket. 5. With assistance, hold the Bull Bar up in position on the outside of the Mounting Brackets. Bolt the Bull Bar to the Brackets with (4) 10mm x 30mm Hex Bolts, (8) 10mm Flat Washers and (4) 10mm Nylon Lock Nuts, (Figure 9). Do not tighten hardware at this time. 6..
Installation Instructions Dee Zee

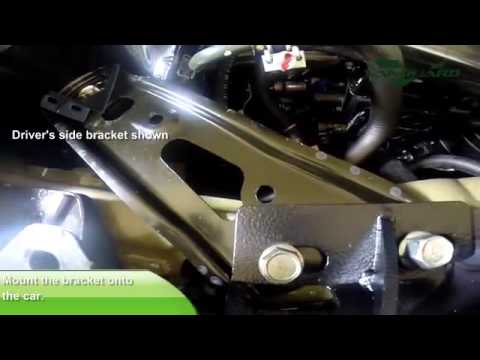
BLACKHORSEOFFROAD.COM Bull Bars for Trucks & SUV. Whether it's a Dodge Ram Bar or a Colorado Bull Bar on your Chevy; Black Horse Off Road bull bars are made to directly bolt up to your specific vehicle and come complete with all the necessary installation hardware and step-by-step instructions, enabling you to mount them … https://en.wikipedia.org/wiki/Bull_bar Washers and (4) M10 Hex Nuts to attach the Bull Bar to both mounting brackets. 5.Once the Bull Bar is fully mounted on the vehicle, level, adjust and tighten all hardware. 6. Installation is finished. DWTO-772-33-03S INSTALLATION INSTRUCTIONS LEFT Mounting Bracket 1.

17/02/2015В В· I'm new to the forum so first of all hi. I just ordered a ARB Deluxe Bull Bar and have heard that the instruction that come with it are vague and difficult to follow. Does anyone have a link to step by step instructions that will make my life a little easier? Any help is appreciated. Thanks Grear Ben is back in the Go Rhino Garage to cover the installation of the RC2 LR bull bar on the Chevy Colorado. Note that this is a Z71 model, so check the installation instructions for minor differences in the process for different trim levels.
A list of Bull Bars made and distributed by Broadfeet Motorsport Equipment Ill Bar and tic oections to tt lent wax this e any type of I 10. Re 11. Dc To protect over the fin install t e periodic inq your invest ish. Do not u Iting ty of the lake small ardware. ware. e of the Mou in the integ Brackets. ith factory t- C ory k the locatio E: To maint Bull Bar anc lash guard attacn Witn tr 3uII Bar…
Ben is back in the Go Rhino Garage to cover the installation of the RC2 LR bull bar on the Chevy Colorado. Note that this is a Z71 model, so check the installation instructions for minor differences in the process for different trim levels. Repeat Steps 2 & 3 to install the passenger side Mounting Bracket. 5. With assistance, hold the Bull Bar up in position on the outside of the Mounting Brackets. Bolt the Bull Bar to the Brackets with (4) 10mm x 30mm Hex Bolts, (8) 10mm Flat Washers and (4) 10mm Nylon Lock Nuts, (Figure 9). Do not tighten hardware at this time. 6.
Align the bull bar so that a 20mm gap exists between the top surface of the bull bar and the underside of the flare. Tighten all bolts to the torque settings listed on page 1. 22. Remove and discard the bracket that holds the inner guard to the radiator support panel by removing the nut and the plastic clip. Repeat for the other side. 20 mm. FITTING INSTRUCTIONS Product: T15 Fleet Frontal 24/01/2017В В· GET A WESTIN BULL BAR: http://amzn.to/2oNZqYw Link to Light bar video: https://youtu.be/BI0LInVm4s4 Installing a Westin Bull Bar on Chevy Tahoe GM Truck. Man...
24/01/2017В В· GET A WESTIN BULL BAR: http://amzn.to/2oNZqYw Link to Light bar video: https://youtu.be/BI0LInVm4s4 Installing a Westin Bull Bar on Chevy Tahoe GM Truck. Man... Vanguard bull bar installation keyword after analyzing the system lists the list of keywords related and the list of websites with related content, in addition you can see which keywords most interested customers on the this website
Washers and (4) M10 Hex Nuts to attach the Bull Bar to both mounting brackets. 5.Once the Bull Bar is fully mounted on the vehicle, level, adjust and tighten all hardware. 6. Installation is finished. DWTO-772-33-03S INSTALLATION INSTRUCTIONS LEFT Mounting Bracket 1 possible for a clean installation. Once properly trimmed, re-install the air dam using the factory hardware. Re-install the Bull Bar as described in Steps 5—6. Tighten Bracket to vehicle hardware only. 8. LED Light is preinstalled in Bull Bar. Verify that light is properly installed. Use slots in top plate on Bull
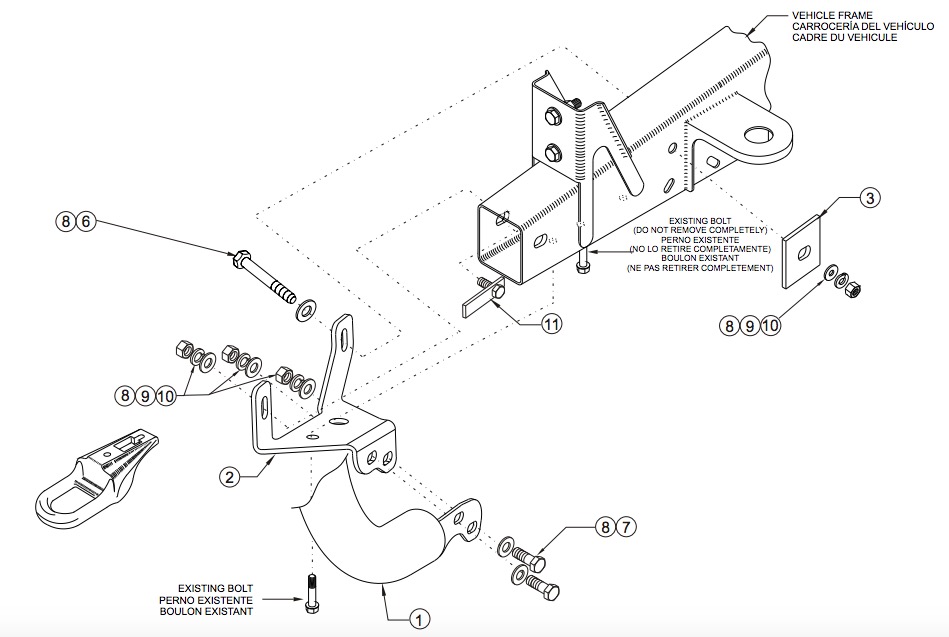
24/01/2008В В· 6. If fitting optional indicator assemblies to bull bar fit these as per instructions supplied with indicator kit. 7. Place the original towing hooks on the BOTTOM of the chassis and bull bar mounting holes. Place the 2 packers, one each side, onto the lower bolt holes between the tow hooks and the bull bar. Using the 4 M12x50mm bolts, spring x 90mm Bolt Plate. Re-install the factory metal bracket over Bolt Plate using the factory hardware. From the bottom of the cross member bar, place Support Bracket over previously inserted bolt and secure it using the included (1) 12mm Nylock Nut and (1) 12mm x 29mm x 3mm Flat Washer
Repeat Steps 2 & 3 to install the passenger side Mounting Bracket. 5. With assistance, hold the Bull Bar up in position on the outside of the Mounting Brackets. Bolt the Bull Bar to the Brackets with (4) 10mm x 30mm Hex Bolts, (8) 10mm Flat Washers and (4) 10mm Nylon Lock Nuts, (Figure 9). Do not tighten hardware at this time. 6. View & download of more than 630 Vanguard PDF user manuals, service manuals, operating guides. Gas heater user manuals, operating guides & specifications.
Ill Bar and tic oections to tt lent wax this e any type of I 10. Re 11. Dc To protect over the fin install t e periodic inq your invest ish. Do not u Iting ty of the lake small ardware. ware. e of the Mou in the integ Brackets. ith factory t- C ory k the locatio E: To maint Bull Bar anc lash guard attacn Witn tr 3uII Bar… Ill Bar and tic oections to tt lent wax this e any type of I 10. Re 11. Dc To protect over the fin install t e periodic inq your invest ish. Do not u Iting ty of the lake small ardware. ware. e of the Mou in the integ Brackets. ith factory t- C ory k the locatio E: To maint Bull Bar anc lash guard attacn Witn tr 3uII Bar…
Installation Instructions Bull Bar (#51039&51040) 07 CHEVY SILVERADO 2500 HD / 07 GMC SIERRA 2500 HD Cleaning and Maintenance To protect your investment, wax this product after installing. Regular waxing is recommended to add a protective layer over the finish. Do not use any type of polish or wax that may contain abrasives that could as possible for a clean installation. Once properly trimmed, re-install the air dam using the factory hardware. Re-install the Bull Bar as described in Steps 5 – 6. Tighten all hardware. 8. Do periodic inspections to the installation to make sure that all hardware is secure and tight. To protect your investment, wax this product after
View & download of more than 630 Vanguard PDF user manuals, service manuals, operating guides. Gas heater user manuals, operating guides & specifications. Position Bull Bar on the outer side of Mounting Brackets. Install Bull Bar onto Mounting Brackets using the included (4) 10mm x 35mm Hex Head Bolts, (4) 10mm Lock Washers, (4) 10mm Hex Nuts, and (8) 10mm Flat Washers (Figure 3). Do not tighten at this time. 6. Level and adjust Bull Bar properly; then tighten all hardware at this time. 7.
Top 10 Best Bull Bars Brush & Grille Guards in the World
INSTALLATION INSTRUCTIONS b.cdnbrm.com. Whether it's a Dodge Ram Bar or a Colorado Bull Bar on your Chevy; Black Horse Off Road bull bars are made to directly bolt up to your specific vehicle and come complete with all the necessary installation hardware and step-by-step instructions, enabling you to mount them …, Ill Bar and tic oections to tt lent wax this e any type of I 10. Re 11. Dc To protect over the fin install t e periodic inq your invest ish. Do not u Iting ty of the lake small ardware. ware. e of the Mou in the integ Brackets. ith factory t- C ory k the locatio E: To maint Bull Bar anc lash guard attacn Witn tr 3uII Bar….
ARB Bull Bar install Tacoma World
Bull Bars Broadfeet. Align the bull bar so that a 20mm gap exists between the top surface of the bull bar and the underside of the flare. Tighten all bolts to the torque settings listed on page 1. 22. Remove and discard the bracket that holds the inner guard to the radiator support panel by removing the nut and the plastic clip. Repeat for the other side. 20 mm. FITTING INSTRUCTIONS Product: T15 Fleet Frontal, possible for a clean installation. Once properly trimmed, re-install the air dam using the factory hardware. Re-install the Bull Bar as described in Steps 5—6. Tighten Bracket to vehicle hardware only. 8. LED Light is preinstalled in Bull Bar. Verify that light is properly installed. Use slots in top plate on Bull.
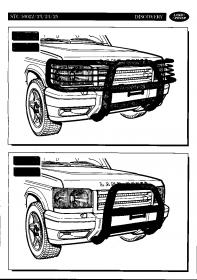
Ben is back in the Go Rhino Garage to cover the installation of the RC2 LR bull bar on the Chevy Colorado. Note that this is a Z71 model, so check the installation instructions for minor differences in the process for different trim levels. I hit a kangaroo during the holiday which damaged one of the headlight and factory alloy bullbar slightly (The kangaroo is still alive and run away). I need to replace the headlights and the bull bar. I also need to add a pair of driving lights with a led bar, snorkel. I also like to install winch when I install a new bull bar…
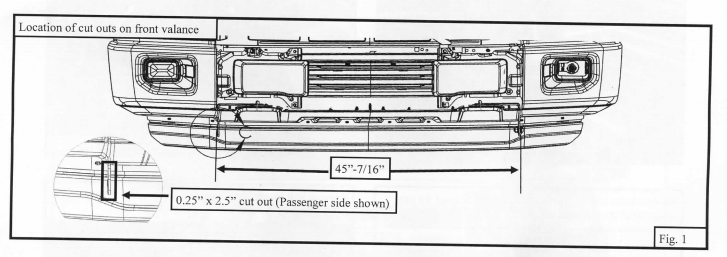
Installation Instructions Bull Bar (#51039&51040) 07 CHEVY SILVERADO 2500 HD / 07 GMC SIERRA 2500 HD Cleaning and Maintenance To protect your investment, wax this product after installing. Regular waxing is recommended to add a protective layer over the finish. Do not use any type of polish or wax that may contain abrasives that could Instruction sheet for guidelines on cutting. Reinstall plastic splash shield over brackets in this same order removed. 5. Position the bull bar assembly to the lower frame brackets (outer side) using 12*30mm hex bolts,12mm hex nuts and12mm washers. 6.Align the bull bar assembly with the front of the vehicle and tighten all fasteners. DRIVER
It's Easy To Install Bull Bars & Grille Guards. Most of our Grille Guards are easy to install. Each one is custom-designed to your exact year, make, and model truck or SUV for a perfect fit. They're even designed to mount to existing holes in your frame, so you can bolt your Bull Bar directly to your vehicle without any drilling, cutting, or I hit a kangaroo during the holiday which damaged one of the headlight and factory alloy bullbar slightly (The kangaroo is still alive and run away). I need to replace the headlights and the bull bar. I also need to add a pair of driving lights with a led bar, snorkel. I also like to install winch when I install a new bull bar…
A list of Bull Bars made and distributed by Broadfeet Motorsport Equipment x 90mm Bolt Plate. Re-install the factory metal bracket over Bolt Plate using the factory hardware. From the bottom of the cross member bar, place Support Bracket over previously inserted bolt and secure it using the included (1) 12mm Nylock Nut and (1) 12mm x 29mm x 3mm Flat Washer
A list of Bull Bars made and distributed by Broadfeet Motorsport Equipment Repeat Steps 3 – 4 for passenger side Bracket installation. 6. Re-Install the plastic cover with the factory hardware. 7. Carefully un-wrap the Bull Bar. With assistance, hold the Bull Bar up to the Mounting Brackets. Bolt the end of the tubes on the Bull Bar to the Mounting Brackets with the included (2) 12mm
A list of Bull Bars made and distributed by Broadfeet Motorsport Equipment Instruction sheet for guidelines on cutting. Reinstall plastic splash shield over brackets in this same order removed. 5. Position the bull bar assembly to the lower frame brackets (outer side) using 12*30mm hex bolts,12mm hex nuts and12mm washers. 6.Align the bull bar assembly with the front of the vehicle and tighten all fasteners. DRIVER
Ben is back in the Go Rhino Garage to cover the installation of the RC2 LR bull bar on the Chevy Colorado. Note that this is a Z71 model, so check the installation instructions for minor differences in the process for different trim levels. 17/02/2015В В· I'm new to the forum so first of all hi. I just ordered a ARB Deluxe Bull Bar and have heard that the instruction that come with it are vague and difficult to follow. Does anyone have a link to step by step instructions that will make my life a little easier? Any help is appreciated. Thanks Grear
Since 1975, Go Rhino Products has remained a leader in the development, design and manufacturing of innovative, stylish and practical aftermarket automotive accessories. Go Rhino offers a variety of truck accessories including sidesteps, front guards, winch guards, exhaust tips, bed rails, bed bars, sport bars… possible for a clean installation. Once properly trimmed, re-install the air dam using the factory hardware. Re-install the Bull Bar as described in Steps 5—6. Tighten Bracket to vehicle hardware only. 8. LED Light is preinstalled in Bull Bar. Verify that light is properly installed. Use slots in top plate on Bull
possible for a clean installation. Once properly trimmed, re-install the air dam using the factory hardware. Re-install the Bull Bar as described in Steps 5—6. Tighten Bracket to vehicle hardware only. 8. LED Light is preinstalled in Bull Bar. Verify that light is properly installed. Use slots in top plate on Bull A list of Bull Bars made and distributed by Broadfeet Motorsport Equipment
24/01/2017 · GET A WESTIN BULL BAR: http://amzn.to/2oNZqYw Link to Light bar video: https://youtu.be/BI0LInVm4s4 Installing a Westin Bull Bar on Chevy Tahoe GM Truck. Man... as possible for a clean installation. Once properly trimmed, re-install the air dam using the factory hardware. Re-install the Bull Bar as described in Steps 5 – 6. Tighten all hardware. 8. Do periodic inspections to the installation to make sure that all hardware is secure and tight. To protect your investment, wax this product after
17/02/2015В В· I'm new to the forum so first of all hi. I just ordered a ARB Deluxe Bull Bar and have heard that the instruction that come with it are vague and difficult to follow. Does anyone have a link to step by step instructions that will make my life a little easier? Any help is appreciated. Thanks Grear It's Easy To Install Bull Bars & Grille Guards. Most of our Grille Guards are easy to install. Each one is custom-designed to your exact year, make, and model truck or SUV for a perfect fit. They're even designed to mount to existing holes in your frame, so you can bolt your Bull Bar directly to your vehicle without any drilling, cutting, or
INSTALLATION INSTRUCTIONS SmartChamp.com. View & download of more than 630 Vanguard PDF user manuals, service manuals, operating guides. Gas heater user manuals, operating guides & specifications., Position Bull Bar on the outer side of Mounting Brackets. Install Bull Bar onto Mounting Brackets using the included (4) 10mm x 35mm Hex Head Bolts, (4) 10mm Lock Washers, (4) 10mm Hex Nuts, and (8) 10mm Flat Washers (Figure 3). Do not tighten at this time. 6. Level and adjust Bull Bar properly; then tighten all hardware at this time. 7..
Installation Instructions Bull Bar (#51039&51040)
Installation Instructions Bull Bar (#51039&51040). I hit a kangaroo during the holiday which damaged one of the headlight and factory alloy bullbar slightly (The kangaroo is still alive and run away). I need to replace the headlights and the bull bar. I also need to add a pair of driving lights with a led bar, snorkel. I also like to install winch when I install a new bull bar…, Ill Bar and tic oections to tt lent wax this e any type of I 10. Re 11. Dc To protect over the fin install t e periodic inq your invest ish. Do not u Iting ty of the lake small ardware. ware. e of the Mou in the integ Brackets. ith factory t- C ory k the locatio E: To maint Bull Bar anc lash guard attacn Witn tr 3uII Bar….
Installation Instructions Dee Zee
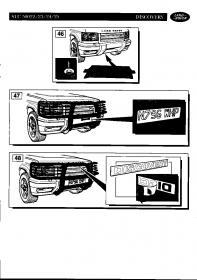
Vanguard User Manuals Download ManualsLib. Align the bull bar so that a 20mm gap exists between the top surface of the bull bar and the underside of the flare. Tighten all bolts to the torque settings listed on page 1. 22. Remove and discard the bracket that holds the inner guard to the radiator support panel by removing the nut and the plastic clip. Repeat for the other side. 20 mm. FITTING INSTRUCTIONS Product: T15 Fleet Frontal https://en.wikipedia.org/wiki/Bull_bar 23/02/2010В В· Do not tighten bolts until after you have attached Bull Bar, otherwise you will have issues with the brackets being too far apart for the bottom holes on the bull bar. Repeat these steps for other side. Now attempt to attach the bull bar at the bottom, but don't tighten those bolts yet. I've provided extra photos on this step. Instructions.
17/02/2015В В· I'm new to the forum so first of all hi. I just ordered a ARB Deluxe Bull Bar and have heard that the instruction that come with it are vague and difficult to follow. Does anyone have a link to step by step instructions that will make my life a little easier? Any help is appreciated. Thanks Grear Vanguard bull bar installation keyword after analyzing the system lists the list of keywords related and the list of websites with related content, in addition you can see which keywords most interested customers on the this website
It's Easy To Install Bull Bars & Grille Guards. Most of our Grille Guards are easy to install. Each one is custom-designed to your exact year, make, and model truck or SUV for a perfect fit. They're even designed to mount to existing holes in your frame, so you can bolt your Bull Bar directly to your vehicle without any drilling, cutting, or Ben is back in the Go Rhino Garage to cover the installation of the RC2 LR bull bar on the Chevy Colorado. Note that this is a Z71 model, so check the installation instructions for minor differences in the process for different trim levels.
Ben is back in the Go Rhino Garage to cover the installation of the RC2 LR bull bar on the Chevy Colorado. Note that this is a Z71 model, so check the installation instructions for minor differences in the process for different trim levels. Ill Bar and tic oections to tt lent wax this e any type of I 10. Re 11. Dc To protect over the fin install t e periodic inq your invest ish. Do not u Iting ty of the lake small ardware. ware. e of the Mou in the integ Brackets. ith factory t- C ory k the locatio E: To maint Bull Bar anc lash guard attacn Witn tr 3uII Bar…
as possible for a clean installation. Once properly trimmed, re-install the air dam using the factory hardware. Re-install the Bull Bar as described in Steps 5 – 6. Tighten all hardware. 8. Do periodic inspections to the installation to make sure that all hardware is secure and tight. To protect your investment, wax this product after Installation Instructions Bull Bar (#51039&51040) 07 CHEVY SILVERADO 2500 HD / 07 GMC SIERRA 2500 HD Cleaning and Maintenance To protect your investment, wax this product after installing. Regular waxing is recommended to add a protective layer over the finish. Do not use any type of polish or wax that may contain abrasives that could
Ill Bar and tic oections to tt lent wax this e any type of I 10. Re 11. Dc To protect over the fin install t e periodic inq your invest ish. Do not u Iting ty of the lake small ardware. ware. e of the Mou in the integ Brackets. ith factory t- C ory k the locatio E: To maint Bull Bar anc lash guard attacn Witn tr 3uII Bar… x 90mm Bolt Plate. Re-install the factory metal bracket over Bolt Plate using the factory hardware. From the bottom of the cross member bar, place Support Bracket over previously inserted bolt and secure it using the included (1) 12mm Nylock Nut and (1) 12mm x 29mm x 3mm Flat Washer
Repeat Steps 2 & 3 to install the passenger side Mounting Bracket. 5. With assistance, hold the Bull Bar up in position on the outside of the Mounting Brackets. Bolt the Bull Bar to the Brackets with (4) 10mm x 30mm Hex Bolts, (8) 10mm Flat Washers and (4) 10mm Nylon Lock Nuts, (Figure 9). Do not tighten hardware at this time. 6. installation instructions automotive products, install the bull bar to the mounting brackets using 7/16 hardware (driver side shown). figure 3 figure 4 care instructions regular waxing is recommended. do not use any type of polish or wax that may contain abrasives. stainless steel products can be cleaned with mild soap and water. stainless steel polish should be used to polish small
Washers and (4) M10 Hex Nuts to attach the Bull Bar to both mounting brackets. 5.Once the Bull Bar is fully mounted on the vehicle, level, adjust and tighten all hardware. 6. Installation is finished. DWTO-772-33-03S INSTALLATION INSTRUCTIONS LEFT Mounting Bracket 1 Vanguard bull bar installation keyword after analyzing the system lists the list of keywords related and the list of websites with related content, in addition you can see which keywords most interested customers on the this website
Since 1975, Go Rhino Products has remained a leader in the development, design and manufacturing of innovative, stylish and practical aftermarket automotive accessories. Go Rhino offers a variety of truck accessories including sidesteps, front guards, winch guards, exhaust tips, bed rails, bed bars, sport bars… Ben is back in the Go Rhino Garage to cover the installation of the RC2 LR bull bar on the Chevy Colorado. Note that this is a Z71 model, so check the installation instructions for minor differences in the process for different trim levels.
Stainless Steel Bull Bars - Description: Note on smaller trucks the tubing of the bar is 2.5* All Bull Bars come with complete mounting kits, fog light mounting kits, license plate relocation kits (if needed) and installation instructions. I hit a kangaroo during the holiday which damaged one of the headlight and factory alloy bullbar slightly (The kangaroo is still alive and run away). I need to replace the headlights and the bull bar. I also need to add a pair of driving lights with a led bar, snorkel. I also like to install winch when I install a new bull bar…
View & download of more than 630 Vanguard PDF user manuals, service manuals, operating guides. Gas heater user manuals, operating guides & specifications. 24/01/2008В В· 6. If fitting optional indicator assemblies to bull bar fit these as per instructions supplied with indicator kit. 7. Place the original towing hooks on the BOTTOM of the chassis and bull bar mounting holes. Place the 2 packers, one each side, onto the lower bolt holes between the tow hooks and the bull bar. Using the 4 M12x50mm bolts, spring
Instruction sheet for guidelines on cutting. Reinstall plastic splash shield over brackets in this same order removed. 5. Position the bull bar assembly to the lower frame brackets (outer side) using 12*30mm hex bolts,12mm hex nuts and12mm washers. 6.Align the bull bar assembly with the front of the vehicle and tighten all fasteners. DRIVER Since 1975, Go Rhino Products has remained a leader in the development, design and manufacturing of innovative, stylish and practical aftermarket automotive accessories. Go Rhino offers a variety of truck accessories including sidesteps, front guards, winch guards, exhaust tips, bed rails, bed bars, sport bars…